. . . tied up with string. This is how your purchase from the Adventure Tool Company arrives. Stylish - and more importantly, it speaks of pride in the contents.

More soon . . .
. . . tied up with string. This is how your purchase from the Adventure Tool Company arrives. Stylish - and more importantly, it speaks of pride in the contents.
More soon . . .
Look at reviews of shock absorbers for four-wheel-drive vehicles in U.S. magazines, and you’ll probably find just two types listed and described:
All modern automotive shock absorbers—dampers if you prefer the more technically accurate term (or dashpots if you like to flummox people in casual conversation)—use oil to retard the oscillations of the vehicle’s springs as they deflect over bumps or depressions, in turns, or when braking or accelerating. As the piston of the shock absorber moves up and down, it displaces oil through valves that restrict how much and how quickly the oil can move, thus attenuating the movement of the spring. Without shock absorbers, the vehicle—especially one equipped with coil or torsion-bar springs, which have very little internal friction—would pogo wildly after hitting a bump or depression, roll dangerously in turns, and nose-dive under braking. Manufacturers vary the valving to suit the vehicle and the application, to adequately control these movements. The valving is inevitably a compromise between ride comfort and control.
So far, so simple. However, the situation changes when you start working a shock hard—say, on a long washboarded road at speed (where the shock piston’s travel, or amplitude, is low but its velocity high), or on a slow rocky section where velocity is low but amplitude high because you’re using all the suspension’s travel. Under these conditions, the shocks can fade—that is, suffer a loss in damping capability so that control is reduced.
First, the harder a shock is worked, the more it heats up, reducing the viscosity of the oil. This allows it to move through the valves more rapidly, reducing effectiveness. An equally important factor is cavitation. When the shock’s piston moves rapidly, it creates a very high pressure zone in front of it and a very low pressure zone behind it. If that low pressure zone drops below what’s called the vapor pressure of the oil, the oil instantly boils—even if it is not hot (remember, water boils in a vacuum even at absolute zero). The boiling creates thousands of micro-sized vapor cavities or voids—and, unlike the oil itself, those voids can be compressed as the shock rebounds, reducing the effective viscosity of the oil and likewise reducing its damping effectiveness. Additionally, as the shock rebounds and the voids collapse, they create microscopic bursts of pressure that can erode seals and the edges of valve shims. The vapor pressure of oil increases with temperature; thus, so does cavitation, exacerbating the heat effect on fade. (You can see exaggerated cavitation in action in a short video HERE.) Finally, in certain shock designs, air or nitrogen gas in the shock can mix with the oil, drastically reducing its effective viscosity with a resultant loss in performance. If your shocks fade badly enough it can severely compromise safe handling of the vehicle, not to mention ruining the ride comfort and potentially damaging other suspension components or the vehicle itself.
Manufacturers try to prevent or reduce cavitation and fade in several ways. Keeping the temperature of the shock oil low is the obvious first goal. Higher-viscosity oil is more resistant to cavitation due to its lower initial vapor pressure, but there’s a practical limit there.
A nearly universal “fix” for cavitation is to pressurize the shock—usually with nitrogen, which is non-corrosive and resists aeration with the oil better than air. A pressurized shock resists the expansion that is the result of cavitation, helping to force the oil to stay in its proper state.
The de Carbon monotube shock, named after its inventor and developed commercially by Bilstein, does this within a single tube that functions as both the outer body of the shock and the cylinder of the piston. The nitrogen is separated from the oil by a second, floating (or dividing) piston.
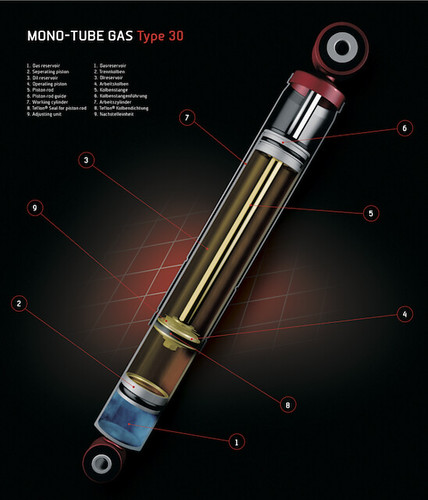 Monotube shock. 1. Gas reservoir 2. Floating piston 3. Oil reservoir 4. Operating piston 5. Piston rod 6. Piston-rod guide 7. Working cylinder 8. Teflon seal for piston rod 9. Adjusting unit
The monotube shock has several advantages, especially in terms of heat dissipation, as the single wall readily radiates to the passing air stream. Since the nitrogen is physically separated from the oil, aeration is eliminated. On the other hand, the high initial pressure of the de Carbon design (often over 300 psi) seems to heat up more quickly to begin with, and that same pressure puts constant stress on the vital piston-rod seal, even when the vehicle is parked. For a given length, a monotube shock will have less travel than a twin-tube shock, since it has to leave room for that gas chamber (this is one reason some such shocks are built with remote reservoirs that incorporate the floating piston and the gas charge). For a four-wheel-drive vehicle, though—especially one that might be employed on long journeys far from resupply—perhaps the biggest disadvantage is the vulnerability of that single tube. One dent from a flung rock will render the shock worthless (although it would take a significant smack, and many drivers put tens of thousands of miles on monotube shocks with no issues).
The twin-tube shock more or less reverses these plusses and minuses. The outer tube can withstand significant dents with no ill effects, since the space between inner and outer tubes is simply an oil and gas reservoir—which also allows longer travel than a monotube shock. That double wall inhibits heat dissipation, although the cylinder can be made thinner. Most twin-tube shocks employ a low-pressure charge of nitrogen in the top of the secondary tube, with no separation from the oil—which is why twin-tube shocks can only be mounted one way, and why a new twin-tube shock should ideally be stood upright and cycled fully several times to properly locate the gas. (Some twin-tube shocks employ a bag of gas, keeping it separated from the oil.) A large majority of original equipment shocks, and many aftermarket designs, use the low-pressure, nitrogen-charged twin-tube design.
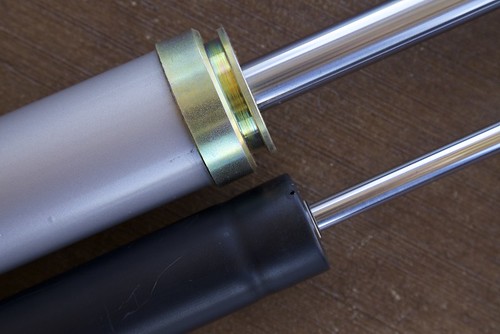
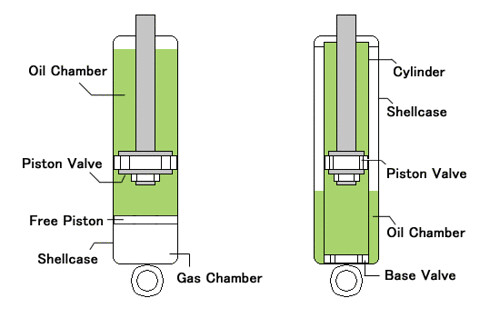 Monotube on the left; twin-tube on the right
But is there another way?
Perhaps the finest shock absorbers I ever had on my FJ40 Land Cruiser were from Koni, the legendary Dutch maker far better known (at the time) for equipping Porsches and BMWs than four-wheel-drive vehicles. I found them at significant expense because I’d had Konis on a street-racer Toyota Corolla and was amazed at how they transformed its handling. The Konis were bereft of any gas charge at all—they relied solely on a hefty volume of oil and sophisticated valving for their effectiveness, and worked sublimely in any situation I threw them at, whether low-speed rock crawling or high-speed Mexican washboard. I only regretfully replaced them when I decided to lift the Land Cruiser’s suspension so I could fit taller tires; Koni had no application for the new setup.
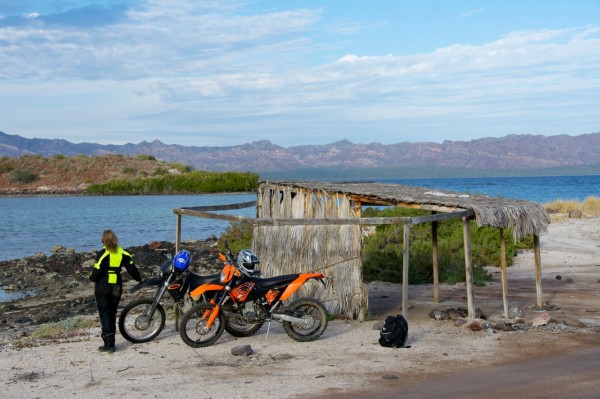
Fast forward 20 years. Roseann and I were scheduled to drive a 3,500-kilometer loop through Tanzania and Kenya, in a Land Rover Defender 110 loaned to us by Paul and Erika Sweet of Shaw Safaris in Arusha. The Shaw Defenders are comprehensively equipped for self-sufficient overland travel, as you can see here:
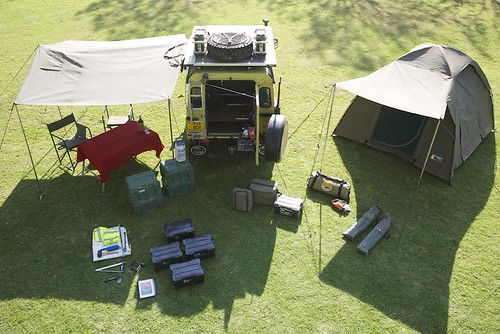
I never had a chance to put “our” 110 on a commercial scale, but I’d be stunned if it wasn’t banging hard on Land Rover’s suggested GVWR, if not significantly over. As Paul and I were going over the vehicle prior to our departure, I looked underneath at the suspension he’d installed. There were mighty coil springs from TJM—and four massive Koni shock absorbers, in the company’s signature red. The Heavy Track Raid, Paul told me, was Koni’s entry in the heavy-duty expedition suspension market, and he’d chosen them after less-than-stellar experience with several other brands.
Our second day on that trip was a 300-kilometer slog to Dodoma on a road cheerfully marked in main-highway-red on the Tanzanian map. It turned out to be a sadly degraded track that involved hours driving at ten or 20 kph, with the suspension cycling fully over ridges and warthog-sized potholes, the 110 rolling side to side like an overloaded tramp freighter in a squall. The road would then duplicitously smooth out until we were tempted to accelerate to a glorious 40 kph—at which point a hidden hole would slam the vehicle nearly to its bump stops.
I say “nearly” because throughout the 12-hour day the Land Rover’s suspension soaked up everything we threw at it with aplomb, maintaining composure whether hammering over corrugations or probing the limits of travel through craters. Several times during the day I crawled under the vehicle and gingerly felt those fat red shocks; at no time were they more than warm to the touch—give it 120-130 degrees at a guess. An astonishing performance—which was repeated virtually every day for the next two weeks as we explored the hinterlands of both countries, far off normal tourist tracks.
Back home I researched the Heavy Track Raids—discovering, much to my annoyance, that they’re unavailable in the U.S. except for certain models of the Mercedes G-Wagen—and found that, just as with my original Konis except to a far greater degree, the Raid relies on a massive volume of oil to control temperatures, rather than combining a lower volume of oil with nitrogen. The fatter shock body also promotes cooling: Since the area of a cylinder increases as a function of the square of the radius, a small increase in diameter results in a big increase in the surface that can radiate heat, even in a twin-tube shock such as the Raid. Further investigation showed the Raid shocks to be widely respected in Australia, where epic cross-country journeys are the norm. Mick Hutton, of Beadell Tours, has kept an exhaustive and convincing record of the performance of Koni Raids on their Land Rovers (HERE).
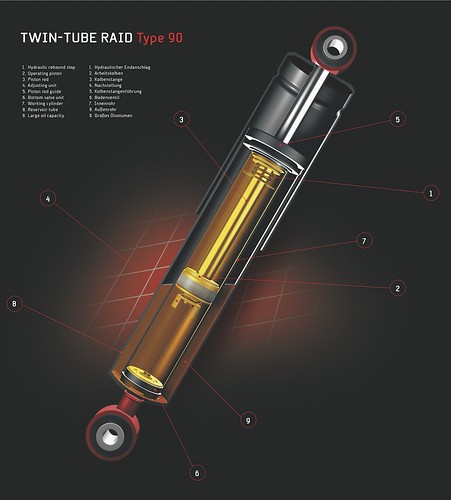 The Koni Heavy Track Raid. 1. Hydraulic rebound stop 2. Operating piston 3. Piston Rod 4. Adjusting unit 5. Piston rod guide 6. Bottom valve unit 7. Working cylinder 8. Reservoir tube 9. Large oil capacity
All right—enough torturing myself about unobtanium shocks. An alternative had been under my nose for some time: Boss, the Australian company that makes the heavy-duty air bags I installed on the JATAC, also makes a line of all-oil twin-tube shock absorbers—with a twist. Rather than filling the top of the secondary tube with pressurized air or nitrogen, the tube is completely filled with oil except for a thick sheet of heavy-duty closed-cell foam that wraps loosely around the inner tube. According to Boss, this accomplishes several things:
Several of these attributes are irrefutable as advantages. More oil is better, period. Keeping gas, whether air or nitrogen, completely separated from the oil is also better.
As to whether the foam-cell is superior to gas pressure in limiting cavitation . . . it depends on with whom you’re talking. The Australian manufacturers who produce both types position the foam-cell shocks above their gas shocks for heavy-duty use, and charge more for them. The Aussie magazine 4WD Action recently ran a comprehensive shock test, in which a foam-cell model, the Tough Dog (made in the same factory as the Boss shocks) came out on top of a stellar field—including the standard Koni Heavy Track.
On the other hand, a suspension engineer with whom I corresponded stated flatly, “There’s no way a foam-cell shock can control cavitation as well as a monotube shock pressurized to 250 psi or more.”
Whichever design has the edge in attenuating cavitation, one feature intrinsic to foam-cell shocks is indisputably advantageous: Since the shock is under no pressure at rest, the piston-rod seal is not constantly being stressed. That can’t help but enhance durability. A side benefit is that the shock is much easier to install—you can adjust the length by hand when offering it up to the mounts. I’ve had to use a bottle jack to compress some high-pressure monotube shocks when fitting them.
The Boss shocks incorporate one more excellent feature: 12-step adjustability, via a dial at the base of the shock. This mechanism—essentially an auxiliary bypass valve with a variable orifice—is shared with a few other excellent trail shocks such as the Rancho RS9000XL. It allows the user to tune the compression damping to suit the load and his preferences, and will also compensate for inevitable wear.
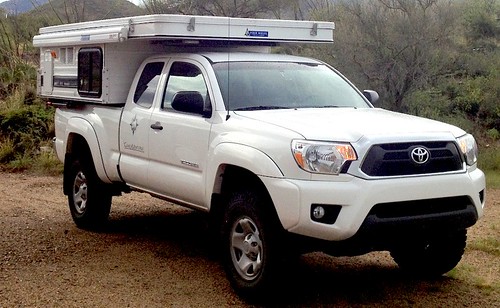
Reece Tasker at Boss Global in Canada arranged to ship a set of shocks to fit our Tacoma. It was impossible not to be impressed by the massive 21mm shafts and 60mm tubes of the Boss shocks. The stock Toyota (Tokico) shocks’ shafts are just 12.5mm in diameter, and look more suitable for supporting a hatchback’s rear window by comparison. The Boss shocks came with rubber boots to protect the shaft; I understand a change to a rigid plastic sleeve is underway (as is a switch to a Viton shaft seal).
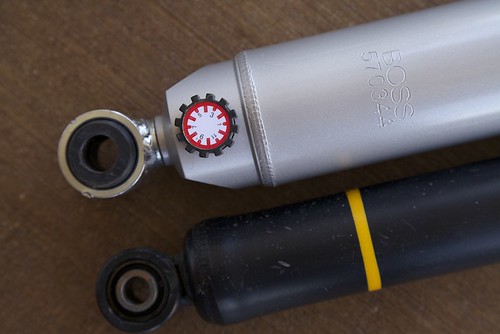
 Boss on top; stock Toyota below
I should note that the shocks were not quite a bolt-in proposition. First, the company does not supply bushings for the oversized lower eye on the front shocks. I had to press out the stock bushings from the OEM Toyota shocks, and press them into the Boss eyelets with a bit of locking compound. Since our OEM shocks had less than 15,000 miles on them there was no issue with wear, but if you were replacing older shocks you’d need new bushings. Simple, right? Except that Toyota does not list those bushings separately for our year Tacoma, only the complete shock. I’ve yet to find an aftermarket alternative. Also, the Boss-supplied lower bushings (rubber with a metal sleeve) for the rear shocks were about a tenth of an inch too wide; I took them down a bit with a belt sender. Finally, at full droop the Toyota’s front anti-roll bar contacted the stout aluminum spring base of the Boss cartridge. I could have left it, or ground off a wedge of the spring base with no harm; instead, I installed a set of Icon relocation plates, which move the bar slightly down and forward, eliminating the interference. (Bilstein makes a similar kit; both bolt on with no drilling.) Perhaps once Boss becomes more established in the North American market, these issues will be solved; in the meantime, it was little trouble to address them.
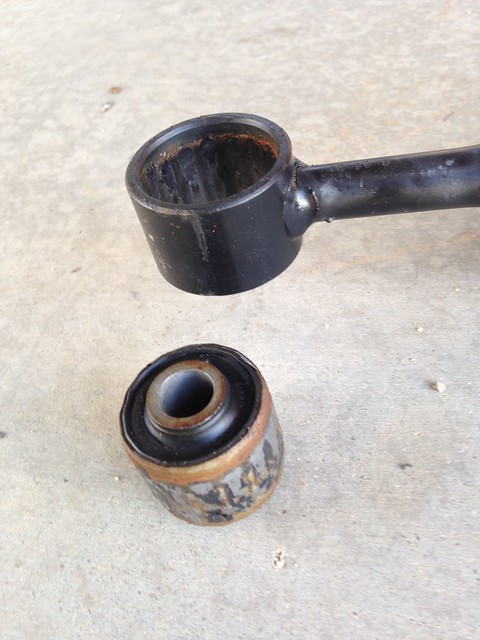 Pressing out the stock lower front bushing
The front Boss units are threaded to adjust ride height—which I left at the stock setting—and utilize the stock Toyota springs. I installed the springs into the new cartridges using my “widowmaker” Craftsman spring compressors—two threaded rods with cast hooks to grab the spring coils. A Snap-on impact wrench speeded up the task of cranking down the compressors (especially after I forgot to install the rubber boot on the first unit and had to disassemble it again). Done properly there’s scant risk to this method; however, if you have access to a proper wall-mounted spring compressor, I recommend it.
Once everything was buttoned up, I set the adjusters at a very modest three up front and five in the rear, and went for a drive along our rough approach road and a couple of nearby trails. The improvement in ride quality was immediately apparent, although no doubt that was partly due to the fact that the front springs previously installed had been 20 percent stiffer than the stock units, which are already on the firm side. High-frequency vibration and small-impact harshness was also noticeably reduced—and that was in part due to the standard rubber bushings in the Boss shocks. Our previous shocks employed Heim joints on the lower attachments. Heim joints, which are all-metal, are wonderful for precise handling and ultra-sharp steering response, but that isn’t a priority in a pickup carrying a camper.
With a few miles on the truck, I decided roll could be reduced a bit, and bumped up the rear shock by one and the front by two. That corrected the issue, and the truck is riding and handling in a fashion I consider close to ideal now. When we add the prototype aluminum front winch bumper we’re working on right now with Pronghorn Overland Gear, and install a winch, it will be easy to adjust the front shocks to suit, and also to bump up the ride height fractionally if necessary.
Based on the last week of driving, I’m optimistic the Boss shocks will prove an excellent match for the JATAC. Expect an update in a few months.
Boss Global is HERE. The Canadian link is HERE. Or you can talk to a live person at 604-799-1869.
While the commentary contains a couple of inaccuracies, the video HERE offers an inside look at foam-cell shock technology.
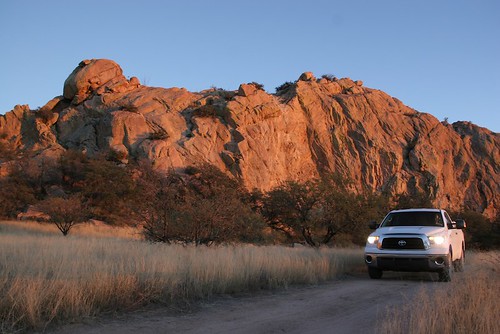 The 2008 Tundra . . . shrug.
I’ve been about as loyal a Toyota fan as one could imagine for a long, long time. My first car was a 1971 Corolla with the nifty little overachiever 1600cc hemi-head engine. The car was chosen, to be honest, as much to annoy my stepfather (who still referred to people from the islands as “Nips”) as for any practical reason. The fact that that second-hand car proved spectacularly reliable in contrast to the new Ford Pinto station wagon my mother had at the time just made it so much sweeter. With suspension from the infant Toyota Racing Development and a set of Weber carbs, my Corolla embarrassed many a BMW 2002 and Z-car on Mt. Lemmon Highway.
In 1978 I bought the ’73 FJ40 that is still with me 300,000 miles later. Nuff said. And there has been a succession of Toyota pickups culminating in the 2012 Tacoma Roseann and I now have. All have been as reliable as the Corolla. The 2000 Tacoma we had under our first Four Wheel Camper required no repairs in 160,000 miles. Zero. So I’ve come to expect, and have enjoyed, utter dependability from the company’s products.
Innovation? Lately, not so much—at least if we’re discussing full-size trucks.
I remember the buzz surrounding the announcement of Toyota’s first “full-size” truck, the T-100, in 1993. When it finally arrived, officials at Ford and GM must have breathed a sigh of relief, if they didn’t laugh out loud—it wasn’t full-sized, and the base engine was . . . a four-cylinder? While the T100 proved as reliable as other Toyotas, and acceptably powerful with the optional V6, it was clearly a false start. So in 1999, its successor was announced with much fanfare and a proper full-size-truck name: the Tundra, as big as all outdoors.
Except, of course, it wasn’t. Yes, it was bigger than the T100, the four-cylinder was gone in favor of a base V6 and an optional proper V8, but the Tundra remained firmly in the unofficial mid-sized truck category. Again it was a workhorse—I know owners with 300,000-mile examples that have never been touched—but it did nothing to directly challenge American hegemony in the big-truck market.
Cue 2007. The second generation Tundra arrived, and . . . it was big. At last Toyota had a genuine full-sized truck, positioned to compete head-on with the best from Ford, GM, and Chrysler. Three hundred eighty horsepower, a 10,000-pound tow rating, available eight-foot bed. Watch out, Big Three.
Or not. I had a chance to review a four-wheel-drive standard-cab Tundra with the 5.7-liter V8 in 2008. There was no denying its impressive size—far too large for my tastes unless I’d also had my dream sailboat to tow with it. But it stood shoulder to shoulder with American trucks, and had the paper specs to compete.
In looking at the window sticker for features, I noticed the chassis described as a “Triple-Tech Frame,” which I assumed was a reference to an updated version of Toyota’s typical fully boxed chassis construction. I peered under the bed, and did a double take. There was no boxing at all under the bed, and only token bits under the front. This was a cheap open C-channel frame that would have looked right at home under a ’73 Ford pickup—the ones you see with side chrome strips about three inches apart where the cab meets the bed. As my English friends would say, I was gobsmacked. For years I’d been preaching the superiority of Toyota’s chassis construction, and here they’d abandoned it for 50-year-old technology and a fancy name. (My impressions were confirmed by THIS alarming video. Just watch it.)
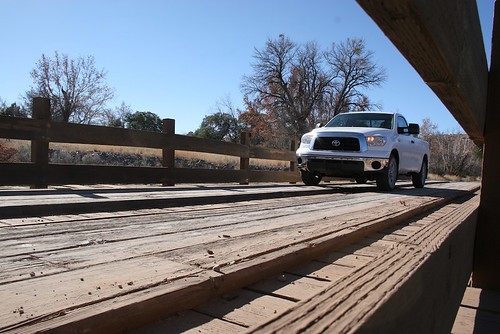
I spent a week with the truck, and . . . it worked just fine. The power was impressive, ride and handling were decent, the interior was okay, if short of the perfect ergonomics I associated with the company (perhaps because I just felt like a Hobbit perched on the seat). Ground clearance was comically inadequate; front air dam contact was inevitable on any but the mildest trail.
When I turned in the keys, I found that my overall reaction to this, Toyota’s broadside at the best-selling vehicles in the United States, its weapon to muscle in on the most iconic American object there is, the pickup truck, was . . . a shrug of the shoulders. There was nothing—simply nothing—I could see that would convince a loyal owner of an American truck to switch brands. No breakthroughs in technology, power, comfort, or economy. If Toyota expected to gain any market share at all except from a relative few owners of small Toyota pickups who found themselves needing a larger one, I predicted failure. Indeed, by 2012 Toyota’s share of the full-size truck market was stuck in the mud at around six percent. (Meanwhile the Tacoma commands well over 50 percent of the compact truck market in the U.S., outselling its nearest competitor by two to one.)
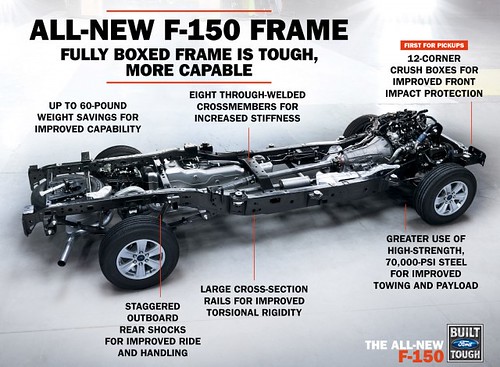
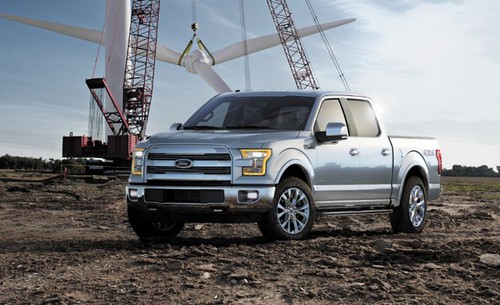
In the last couple of years there has been an avalanche of news about redesigned full-size trucks, with stunning advancements in technology. RAM introduced a sophisticated coil-spring rear suspension and announced a new turbodiesel engine that should catapult fuel economy figures into the high 20s. And Ford has completely rewritten the full-size-truck rule book with its 2015 F150, which will incorporate extensive use of aluminum, including the cab and bed. Incidentally, the chassis of that F150 is not only fully boxed, the crossmembers extend all the way through the boxed side rails and are welded on both sides. Now that’s the way to build a truck frame.
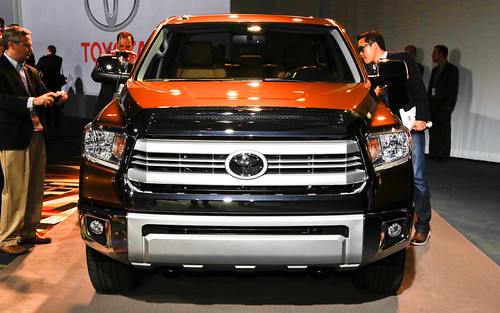
Along the way, I got a news item regarding the redesigned 2014 Tundra. Would this be the one? I clicked on the item, and found that the 2014 Tundra had indeed been thoroughly worked over, end to end.
Or rather, end and end: It had a new grille. And “TUNDRA” is now embossed on the tailgate, in letters as big as all outdoors.
In between? Pretty much zip.
 Thanks, Toyota.
There’s a crude colloquial expression I could use here to urge Toyota to either get serious with the Tundra or abandon the segment altogether, but I’ll refrain. Nevertheless, I think the company needs to do one or the other.
 What it should have been.


More soon . . .

My friend, master mechanic Bill Lee, sent me these photos. Ponder for a moment the difference between the owner's manual for a 1985 Toyota Land Cruiser, 144 pages long, and the suite of manuals for a 2013 Lexus RX 450h, totalling 1,750 pages.
Have you read War and Peace? It's shorter by 300 pages . . .

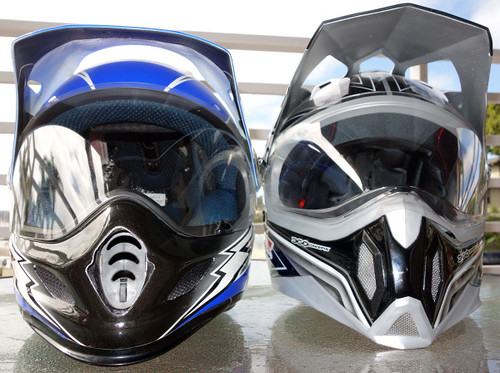 $400 Arai Xd-3, left; $160 MX453, right
(Editor's note: Carla King recently conducted one of her typically thorough tests of a new and very affordable helmet from LS2, on a trip to Baja with Jonathan Ely. Thanks to Carla for the fine review.)
By Carla King
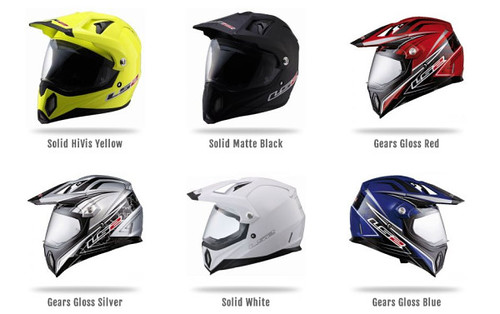
When my friend Reg Kittrelle asked me if I’d like to try an LS2 MX453 Dual-Sport Adventure Motorcycle Helmet I said, "I've never heard of it, but dual-sport adventure? I'm in!" I guess I have been living under a rock because LS2 sponsored 76 riders in the 2013 Dakar rally, including the winner Cyril Despres, and almost 100 riders in the 2014 rally. But the company has operated in stealth mode for quite some time, making helmets for well-known brands (as MHR helmets) before deciding to strike out on their own. They hired a Spanish marketing firm who set to work on design and style, then started selling factory direct to keep prices low. The MX453 Adventure costs only $169.95, undercutting name brands in the dual-sport adventure helmet market by hundreds while vastly surpassing the quality of other helmets in its price range.
The category "dual-sport adventure helmet" is defined by its hybrid components: a dual-sport or motocross style helmet with a large eye port covered by a flip-down shield where you’d normally wear goggles. These helmets also sport a visor to shield your eyes from the sun and an extended chin bar for breathing room and ventilation. All this so you can exercise your right to wrestle your bike through the dirt heading west at sunset. Here's Reg on YouTube explaining the "adventure helmet" concept.
The target market for this variation on helmets is riders like me with our single-cylinder dual-sport enduros like the KLR 650 and KTM 690, and the big-bore adventure motorcyclists with BMW and KTM Adventures and the skills for off-tarmac fun. I see another great market in riders of the smaller dual-sport bikes who set off across the Sahara all the way to Cape Town, never exceeding 40 mph.
Touring helmets, like my Schuberth C3 modular (review HERE), by contrast, are targeted to long-distance tarmac riders attracted to speed and aerodynamics. In short, a visor, despite the sunshade, would only slow us down. But if you do both touring and dual-sport touring, your need for more than one purpose-built helmet is justified—along with a stable of motorcycles to match, of course.
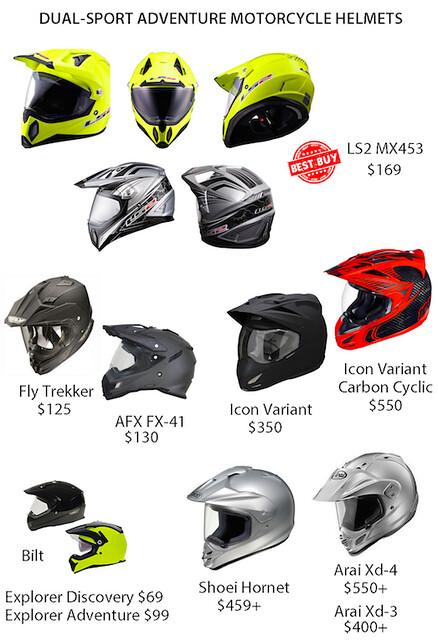
The LS2 MX453 arrived just in time for Jonathan Ely and me to take it along on a trip to Baja, trailering our KTM 350 and 450 EXCs. Jonathan, by the way, owns the pricy Arai XD-3 ($500) which made it easy to compare the Adventure feature-by-feature. (The new Arai XD-4 is available now.) For this review I also researched many other helmets in the dual-sport adventure category, doing some price and feature comparisons on the most popular. The two closest competitors are the Fly Trekker and AFX FX-41 in the $125 range. There really is no “mid-range” product in this category - though it could be argued that the LS2 would sit here if sold at a higher price via an intermediary. I did find the Icon Variant, which looks similar but is more a “hybrid” street helmet than a dual-sport helmet. One Variant is priced at $350 and the lighter carbon fiber model is $550. Then there’s the rock-bottom Bilt brand starting at an unbelievable $69. Finally you’ve got the brands on the highest ends, the Shoei Hornet and Arai Xd-4, both at over $550. There are many more but I just had to stop geeking out on this topic and finish this review.
In Baja, Jonathan and I unloaded the KTM dual-sports to explore backcountry and beaches, taking them for short rides down the tarmac at about 50 mph. We rode long stretches of remote sandy beaches and some scrabbly trails that usually dead-ended in impassible cactus-infested rock faces. Since the KTMs are unfaired I had expected the visor on the Adventure to catch the wind and throw my head back at tarmac speeds, but two very large diamond-shaped cutouts let the air through and prevented liftoff. Though Jonathan loyally defends his Arai, he had to admit that this was a thoughtful feature. Check out the photo comparing the two designs and you’ll see why I have less lift-off when riding at high speeds.
The MX453 Adventure’s fiberglass tricomposite shell also makes the helmet impressively light - not noticeably heavier than Jonathan’s size medium XD-3. My size small fit me perfectly and I found it very comfortable riding all afternoon. I haven’t used it for all-day touring yet but I think four or five hours at a time proves its wearability. The cheek pads are cut from one solid block of foam and other inner padding is smooth and substantial enough to keep my head from rattling around or making contact with any hard parts. There is also not any noticeable noise from the helmet itself, an irritation I’ve found with many lower-priced helmets.
When I took it for the first ride down Baja Highway One I was immediately struck by the view afforded by the ultra-large eye port they branded with the term “360 Concepts.” It actually gave me the startling feeling I wasn’t wearing a helmet at all. It was truly weird to feel as if there was nothing between my face and the road and I kept tapping the shield just to make sure. Soon there were a couple of bugs on it which eased my mind. This would also attest to the quality of the shield, which doesn’t distort the view. I wore my polarized Maui Jim sunglasses under the helmet with no discomfort. (My shield is clear but you can buy tinted shields.) Of course I also appreciated the visor to shade my eyes from the glaring Baja sun.
In the photo of the Arai and the LS2 side-by-side you can also see the large curved area at the bottom of the shield, which makes it easy to flip up no matter where you put your thumb. (But it also distorts your view when looking straight down, which didn’t really bother me.) The shield actuation is incredibly smooth and it stays where you put it. Many other helmets have one small visor-lift tab placed on the left side. The shield actuation on the Arai is on the firm side, and it’s sealed with a substantial gasket. The only irritation I’ve had with the MX453 so far is that the flimsy gray gasket has already started to pull away on the left side where my thumb rubbed when I pushed up the shield. (You can also see that in the photo.) Since I ride in San Diego and Mexico I wonder if that’s a result of the glue drying out in our consistently dry weather conditions. It’s nothing that a new application of glue won’t fix, and I’m not trying to compare it directly to the Arai, which of course is three times the price. That said, you’ll notice that Jonathan’s front vent went missing in Baja, again, possibly due to hot dry conditions drying out the glue. Oh, the sacrifices we make for living in Southern California!
The venting on the Adventure was adequate with a more airy feel than any other motocross helmet or conventional helmet I’ve ever worn. This might be more indicative of this style of helmet than the LS2 specifically, since they’ve all got the motocross helmet style breathing room and a shield instead of goggles pushing against your face. Speaking of goggles, other reviewers have noted that it’s much easier to fit goggles under the shield on the Adventure than other brands. (The shield is also easy to remove if you want to wear googles only.) There’s a lot of room in the chin bar for heavy breathing which is so much appreciated when working hard to get the bike through rocks and sand. A switch inside the chin bar controls the front vents, and two vents on top are also switchable. I could feel airflow through the chin and top of the head all the way to the exhaust vents at the back.
You can buy the LS2 MX453 Adventure helmet at online dealers and even at Amazon, along with replacement padding, shields, and visors. The sizes seem "true" and it was an easy fit with no pressure points - which is the impression other reviewers have had as well.
Jonathan bought his $500 Arai because it’s the quietest dual-sport adventure helmet available and it’s also got very high safety ratings. Comparatively, the $160 Adventure seems quiet enough and in fact one respected reviewer found it quieter than the Shoei Hornet. Nevertheless, I still wear earplugs (which I don’t always wear with my Schuberth C3) because the KTM is louder and buzzier than my other bikes and of course I ride off-pavement at higher RPMs.
The MX453 Adventure is DOT and ECE approved but not Schnell approved, but if it’s good enough for Europe it’s good enough for me. The chinstrap is nicely padded and has a standard D-ring closure system. (But I do wish everyone would go to the European ratchet system that I’ve grown so fond of on my Schuberth C3.)
When you compare the Adventure feature-by-feature with other helmets in this price range it quickly becomes apparent that this is the best buy by far in the low to mid-priced group. This may be a result of the factory-direct distribution which cuts out the intermediary sales channel. The new Arai Xd-4 at over $500 is generally considered as the best in this category, and it is proven the quietest. But of course if you have a Shoei head (and $500), you’d spend your money with them. If you’re super price conscious you might be tempted by the Bilt helmet at an amazingly low $69, or the popular ACX or Fly models at $30 less. But after a few casual try-ons at motorcycle stores, and after researching expert opinions around the web, I’ve come to the conclusion that spending the $160 on the LS2 MX453 Adventure would be the wisest investment.
I’m really glad Reg at LS2 approached me to test out this helmet. It is perfect for my style of riding, which is mainly adventure touring on the KLR and the R100GS, and dual-sporting on the smaller KTM 350 EXC. Heck, I might even try it when riding my big Moto Guzzi cruiser, so that on my rides from Borrego Springs back home to San Diego the visor shelters me from the glare of the setting sun.
LS2 is HERE.
Experienced mechanics don't often sound giddy over the phone, but Dave Anderson sounded giddy when he called me from his Flagstaff, Arizona, shop, the Good Carma Garage (which really should be a radio program).
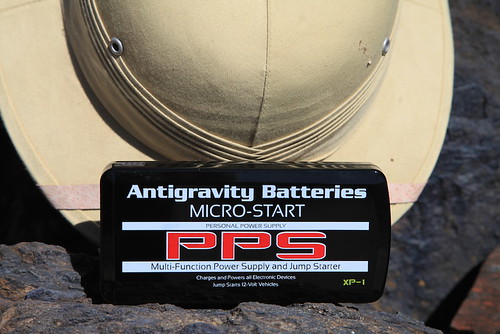
“I just bought this thing off a tool truck, and you have to get one,” he said, “You’re going to think it should be on every overlander’s equipment list—even before he buys a pith helmet.”
Dave. Such a kidder. As it happens, I own a pith helmet. And not one of those fake ones made from cork or, worse, styrofoam, either (I won’t even mention Graham’s mesh thing)—mine is a genuine pith helmet made in Vietnam from the pith of the Aeschynomene aspera, or sola plant (one of the original names for the helmet, sola topee, was later corrupted to solar topee). While they’re now little more than a Hollywood cliché, pith helmets are eminently practical—the thick fibrous material offers exceptional insulation from the tropical sun when touring one’s tea plantation or stalking a man-eating tiger with a Rigby.
Where was I? Oh, right: At Dave’s insistence I ordered a Micro-Start XP-1 from Antigravity Batteries. The zippered pouch that arrived three days later was no bigger than a calendar/day planner (remember those?). Inside was a bewildering array of adapters for charging various electronic devices from phones to laptops, and an astonishingly lightweight (15 ounces), 225-amp-hour lithium/ion battery, just one by three by six inches, which, incidentally, can also be used to jump-start your truck.
Say what?

It’s true. The pouch includes a set of battery-post clamps, and the company claims the power pack will start a V8-engined truck—not once, but several times.
Could this mean the end of jumper cables? I’ve always hated those things, and especially I hate what happens when I play good Samaritan to jump some poor bloke’s dead Malibu—in trying to help he always wants to grab the cables and hook them up in the wrong sequence—if not to the wrong terminals. I have to come off as a tyrant just to do a good deed. With the Micro-Start I’d be in complete control of the situation. And of course if your own vehicle becomes stranded you are completely removed from the need for a donor vehicle—handy if the nearest candidate might be 40 miles away.
The instructions for jump-starting a vehicle tell you to hook up the terminal clamps to the dead battery first, then plug the siamese fitting into the power pack. The reason for this is that, while the teeth of the clamps are well-surrounded by plastic, it would theoretically be possible to screw up and touch them together, resulting in the same alarming pop and flash you get when you do the same thing with jumper cables. If you were really determined and managed to clamp the teeth together, a puff of smoke would signal the death of your power source. I found it easy to remember to hook up the clamps first and then attach the battery, and virtually impossible to remember to unplug them first and then undo the clamps after use. But I never shorted anything.
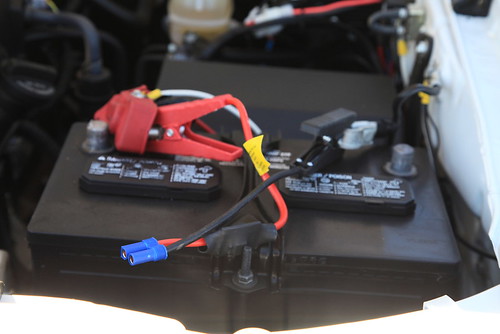 Hook up the terminal clips first, then plug in the power pack.
So how well does the XP-1 work? I disconnected our Tacoma’s battery to give it a try by clamping the leads directly to the battery cables. I wanted to video the process, and while setting up the camera I simply stashed the XP-1 battery in my back Levi’s pocket—it really is that small.
You can find more torturous demonstrations online, but the initial trial on the Tacoma went thusly:
It was impossible to detect a difference between the XP-1 and the way the truck fires with its own battery. I started it three times in a row with no trouble at all, and there were four blue LEDs left out of five on the battery’s charge indicator. Clearly there’s not only sufficient amperage inside that little brick to turn a V6’s starter motor, but to do it multiple times.
As impressive as that demonstration was, it simply confirmed the maker’s claims. Looking around for an unfair test, my eyes alighted on our 1985 Mercedes 300D turbodiesel. To start that the XP-1 would first have to power the glow plugs, then turn the hi-amperage starter necessary to crank a five-cylinder engine with 18:1 compression. After recharging the power pack and removing the cables from the 300D’s massive battery, I hooked up the XP-1, and:
Okay, so that was a bit too much to ask. (Scot Schafer at Antigravity Batteries confirms that they have a model in the works that will be configured for the much tougher task of starting diesel engines.) Rather alarmingly, there were no blue LEDs left on the charge indicator after the Mercedes experiment. Had I killed this thing 15 minutes after first deploying it? I plugged in its 120-volt charger (there’s also a 12-volt car adapter)—and an hour later it was back at full charge. It’s a resilient piece of equipment.
If your vehicle is powered by anything up to a 400-cubic-inch gasoline V8, the XP-1 will provide you with ample starting capability. The battery will retain its charge for many months at a time; if you remember to give it a top-up every half year or so you should be pretty much immune to becoming stranded due to a bad battery. And think of the effect on the owner of the dead Malibu when you start his car with a magic box the size of a paperback. It might be a good idea to keep a few XP-1 kits in the truck to sell at an exorbitant profit . . .
The XP-1 is a bargain at around $140. A basic model, the XP-3, sans the adapters for personal electronic devices, is available for about $30 less. AntiGravity Batteries is HERE.
Very rarely am I left open-mouthed by a new automotive invention, but this one left me gobsmacked. Land Rover is experimenting with a system that employs a camera, mounted in the front bumper, which projects its image on a heads-up display in the windshield shaped exactly like the driver's view of the hood, pardon me, bonnet. The effect is of being able to see right through the hood/bonnet, engine, and suspension to the trail as the vehicle drives over it.
Not only would this hugely improve wheel placement, it would also end that stomach-tightening moment as you crest a blind rise.
Watch the video:
Wired has more on the story HERE.
Yes, I checked, and the story was posted April 9th, not April 1st.

The one certain thing about any knife on earth is that it will eventually become dull with use. Since steel was first created by the accidental introduction of carbon into iron, knife makers have strived to balance several conflicting requirements, among them the ability to hold an edge and the ability to be sharpened easily. Obviously it’s essentially impossible to have both properties in the same blade (the Italics are there because it’s not quite a black and white choice). Serious knife users tend to fall into two categories: those who prefer a long-lasting edge and are willing to put up with the extra work necessary to sharpen it when it finally dulls, and those who want to be able to sharpen the knife quickly and are willing to do it more often. Count me in the former category: I don’t mind spending half an hour sharpening one knife at home if it will last through, say, skinning and butchering an elk in the field without needing touching up.
The basic gauge of steel hardness is the Rockwell Scale, named for Hugh and Stanley Rockwell, who developed a machine to quantify it. The Rockwell test for knife steels employs a 300-pound-plus weight that presses a sharp diamond cone into the material. The depth to which the cone penetrates the surface reveals the hardness of the material (on older Puma knives every product was subjected to this test, and the resulting tiny crater in the steel proudly indicated with a sticker).
So far, so good. Obviously, the harder the steel the stronger, and the better it will hold an edge, right? Simply buy a knife made from the hardest steel you can find. Done.
Not so fast. As steel becomes harder, it also frequently becomes more brittle, and this can make a fine edge—indeed the entire blade—susceptible to bending or impact forces.
A proper knife blade must thus balance several qualities. As described by knife makers:
Wear resistance indicates the resistance of the knife to abrasion. This is largely determined by the density and distribution of carbides (compounds of carbon and other metalic elements) within the finished blade.
Toughness describes the ability of the knife to survive impacts or bending without breaking. On the edge this translates to resistance to chipping.
Strength is the ability of the knife to resist bending in the first place. This is directly related to the Rockwell hardness. Strength helps prevent microscopic folding of the edge during use, which is perceived by the user as dulling.
Edge holding: Not the same thing as wear resistance, edge holding ability varies with all of the above properties.
Stain resistance is the least important quality of the steel, unless you really like shiny knives. Many stainless blades (which are only stain-resistant) lack the toughness and edge-holding of some non-stainless blades.
The science of making knife steel revolves around the blending of various alloys to achieve the best possible compromise. It’s easy and cheap to make a steel that holds an edge well or can withstand bending or is easy to sharpen; it’s extremely difficult to make one that displays all those qualities. But modern alloys are resulting in knife blades that are both tougher and stronger than those of just a decade ago. Manufacturers have found new ways of making steel, such as the particle metallurgy pioneered by Crucible Industries, which results in extremely fine microstructures in the finished alloy, enhancing virtually every desirable characteristic.
Once the steel is in the hands of the knifemaker, the art begins, because how the maker heat treats the blade determines how the particular alloy being used will perform in the end product. Heat treating involves successive heating and cooling of the blade, at different temperatures and speeds, sometimes on specific areas of the blade, sometimes immersed in different mediums to control certain aspects of the process. The result is that two knives made from an identical steel alloy can display significantly different performance. In fact, good steel can ruined with improper heat treating, and the lowliest carbon-steel knife can display awesome performance given careful differential heat treatment.
There are two other ways to alter or augment the properties of knife steel: laminating and pattern-welding. Laminated blades combine a center of very hard steel with outer layers of softer steel, to give the knife both superior edge-holding and toughness. Pattern-welded steel produces the lovely swirled effect you see on many high-grade knife blades. Commonly, but incorrectly, called Damascus (which is entirely different), pattern-welded steel comprises layers of different types of steel, repeatedly heated and folded over to gain a blade that can have hundreds of layers. The original intent of pattern-welded steel was to combine soft iron and brittle carbon steel to combine edge-holding and toughness. With today’s steels this is not necessary; most modern pattern-welded blades are done strictly for effect.
An extreme example of this can be found in ceramic knives—not steel at all of course, but sintered zirconium oxide or zirconium carbide. Ceramic knives, which display a Rockwell hardness of around 75 (compared to the R58 to R60 of an average knife), hold their edges fabulously well, but are relatively fragile: they can chip if torqued when cutting, and can actually break if dropped on a hard floor.
 You can spot three obvious chips in this short section of the Tachi's blade.
Several years ago I decided to give ceramic blades a try. I chose a small Tachi kitchen knife, thinking that if it worked out it would be a good size for the camper.
Right off the bat, I was disappointed in the edge as it came from the factory. Given the hype, I expected scalpel-like cutting; instead, we found that any one of our steel Henckels knives easily exceeded it at such tests as cleanly slicing tomatoes. Okay, so we’d have a sort-of-sharp blade that would last a long time, right? Nope. Even with firm parameters as to how we used the Tachi—essentially as a vegetable knife, period—we soon noticed micro-chips in the edge, followed by several not-so-micro-sized chips. We wondered simultaneously: Where are those little missing chips going? An alarming thought. Since a ceramic knife can only be sharpened with specialized equipment, we were stuck either living with it or sending it back in for the $10 service. Instead, we simply found ourselves using it less and less. Finally, Roseann managed to drop the thing (subconsciously on purpose?), and snap. The partial-tang blade parted ways with its handle.
The technology might improve—one imagines some sort of steel/ceramic hybrid—but for now, I’ll stick with steel knives.
 My FJ40 Land Cruiser has been riding on an Old Man Emu suspension for about eight years now. It’s OME’s standard kit for the FJ40, comprising a useful but easy-on-driveshaft-angle two-inch lift (which gave me enough room to install 255/85-16 BFG MTs), and low-pressure nitrogen-gas-charged shock absorbers. It’s been flawlessly reliable, and does wonders for the short 90-inch wheelbase of the 40; in fact it rides better over the rough seven-mile dirt and rock approach to our desert cottage than our 2012 Tacoma (128-inch wheelbase) did on its stock springs and shocks, which were far too stiff.
The suspension is still perfectly functional—there is no obvious sagging and the shocks aren’t leaking—but it’s been looking tired. The shocks are faded and sand-blasted, and in photos I was amazed to see how rusty the springs looked; something I’d apparently become used to in person.

The 40 spends its time at the Overland Expo front and center—it’s either ensconced outside the Overland Oasis tent or used as a winch platform for the Camel Trophy team—and apparently ARB USA, the importers of OME suspension, felt that their springs and shocks shouldn’t be the rattiest looking component of the vehicle, because they supplied me with a replacement kit.
I spent the last couple of days removing the old suspension and installing the shiny new stuff, and it’s clear the FJ40 is feeling chuffed. It always runs a little better after it gets a spa treatment.
But here’s the amazing thing: When I pulled off the old front springs and set one of them next to one of the new springs, the height was . . . close? No—it was identical. Same with the rears. As far as my eye can tell those rusty old springs hadn’t lost a millimeter of height.

Not impressed? Consider this: I bought that original OME kit used. It had been on an FJ40 that was part of a fleet running guided 4WD tours in northern Arizona, and had several years of daily commercial use on it before I gave it a new lease on life, courtesy a local Land Cruiser scrounger who bought the entire fleet, if I recall correctly.
There’s one caveat: Those first OME springs were manufactured in Australia. The replacement set is from their “Dakar” line, which is manufactured in Malaysia (I guess calling it the “Malay” line just wouldn’t have the same cachet). The Dakar springs are made to OME’s specifications, have all the same construction features, and carry the same guarantee as their Australian predecessors, but they simply have not been around long enough to determine if they’ll prove as durable.
Expect an update in 2024.
 Cascade effect: I guess I need to paint my axles now . . .
Partial non sequitur: Among the myriad animals hanging around our place in the desert (see HERE) are small lizards whose common name is lesser earless, due to the logical fact that they have no external ear openings and are smaller than the greater earless lizard. I suspect lesser earless lizards evolved to follow large herbivores to catch the arthropods they kick up, because they are utterly fearless around humans and often get dangerously underfoot.

While I was replacing the suspension, I somehow lost one of the dished washers that compress the shock absorber eyes. I’ve no idea how I did it; it was simply gone when I went to install the new shock. I must have somehow flicked or kicked it into the gravel next to the concrete, but no amount of searching could unearth it. The washer is a dull gray, as is the gravel. It was maddening.
As I searched, the lesser earless that had been hanging around while I worked kept darting so close I was terrified of stepping on him. Finally, as I was making one last desperate effort to find the washer before giving up and ordering a new one, I again caught in my peripheral vision the lizard darting toward me. I looked down, and it had stopped and was looking up at me—with one foot on the washer.
If it had spoken aloud and said, “Here’s your washer; can I have a bug now?” I wouldn’t have been the slightest bit surprised.