![]()
The knife was almost certainly mankind’s first manufactured tool into which we put not just craftsmanship, but artistry. First (after poking around that funny black monolith) we simply grabbed handy tree limbs for clubs, or rocks suitable for smashing things. Then, about 2.5 million years ago, a perceptive hominid noticed a river rock with a naturally chipped edge that proved much superior for cracking open bones or the skull of a rival. Jump ahead a million years, and his Homo erectus descendants had learned how to flake quartzite and basalt into sophisticated and sharp bifaced hand axes. Next came flint and obsidian spear points and arrowheads, with finer and finer workmanship. Somewhere along the line a smart craftsman lashed a bone or antler handle to his skinning blade—and from that point forward the design of the knife strayed not a bit except for the steady evolution of material and the eventual innovation of folding blades. The knife became our single most indispensable personal-carry tool, and stayed that way right up to the advent of the iPhone.
When I was younger, if you went outdoors, whether for hiking, backpacking, canoeing, car camping, hunting—whatever—you carried a fixed-blade sheath knife, the direct descendant of that flint-and-bone progenitor. It was axiomatic that the knife would be your primary tool for dozens of tasks: cutting rope and webbing, field-dressing fish or game, cooking and eating, carving, you name it. It was also axiomatic that a fixed-blade knife would be the best choice for those tasks, given its superior strength and control over a folding knife, and easy one-hand accessibility right there at your belt. I got my first sheath knife when I was seven, as did my best friend, and neither we nor neighbors who saw us carrying them around our rural community thought a thing of it.
Not any more. With the exception of increasingly rarified circumstances and company, wearing a sheath knife today—even if you’re an adult—seems to be considered, at best, ostentatious, and at worst an aggressive “statement” that indicates you might also support private ownership of tactical nuclear weapons. I’ve related before the story of an acquaintance who wore one into a West Coast coffee shop and was accosted by a woman demanding to know what he was doing “with that weapon in here.” He swears he replied, “Lady, you should hear what the voices in my head are telling me to do with it.” A seven-year-old carrying a sheath knife today? He would probably be remanded to Social Services and his parents jailed.
I say we fight back—figuratively speaking, of course. If you own a fixed-blade knife and have ever felt too self-conscious to carry it, and then had to perform some task with a pocket knife clearly too small for the job, strap that thing on next time. Don’t own a fixed-blade knife? Go get one, learn how to sharpen it properly, and carry it proudly.
There are undoubtedly thousands of fixed-blade knife (let’s say FBK from now on) models marketed as suitable for general field work, but you can broadly divide their design philosophy in two: handy designs with plain (i.e. non-serrated) edges and blades between three and five inches in length, and much larger, heavier tools with six, eight, even ten-inch blades (often nearly 1/4-inch thick at the spine), that supposedly can also be used for chopping, hammering, and, if you believe some of the ads, hacking your way out of your downed F16’s cockpit, spearing caribou after securing the handle to a stick with your unraveled paracord bracelet—and, of course, fighting off zombie hordes.
Gee, I guess my prejudice is showing already.
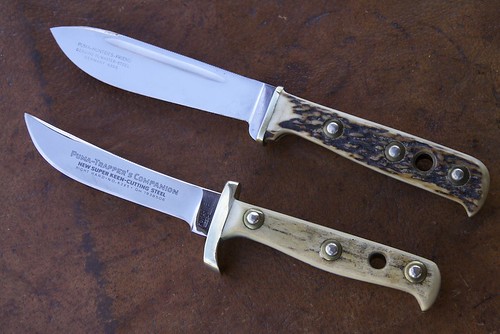
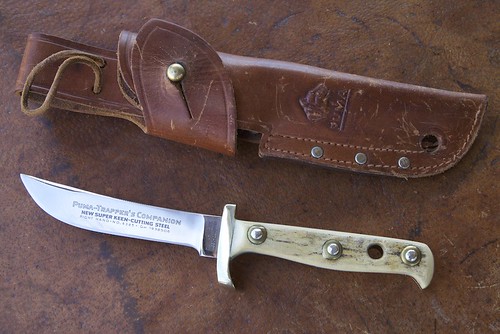
For decades, my FBKs were all the former style, from that first blade in second grade to the Buck Personal that was the first knife I bought myself, to the dream knife I couldn’t afford then but purchased at a usurious collector price decades later: the near-mythical (well, among knife wonks anyway) Puma Trapper’s Companion—$32 in 1970; $400 30 years on.
![]() A classic Puma Hunter's Friend, above, and the even more classic Trapper's Companion, below. (Sadly, Puma knives aren't what they used to be; those made prior to 1995 or so are the best) Along the way I discovered perhaps the most versatile style of all: the so-called bushcraft knife, defined by the Woodlore, which was designed by Ray Mears in 1990 and is now copied by knifemakers everywhere. Like Ray himself, the Woodlore is an unassuming thing with a 4.25-inch, spear-point blade. It employs what’s known as a Scandinavian (“Scandi”) grind: The blade holds its thickness from the top (spine) most of the way toward the edge, which has a single bevel extending quite high up each side.
A classic Puma Hunter's Friend, above, and the even more classic Trapper's Companion, below. (Sadly, Puma knives aren't what they used to be; those made prior to 1995 or so are the best) Along the way I discovered perhaps the most versatile style of all: the so-called bushcraft knife, defined by the Woodlore, which was designed by Ray Mears in 1990 and is now copied by knifemakers everywhere. Like Ray himself, the Woodlore is an unassuming thing with a 4.25-inch, spear-point blade. It employs what’s known as a Scandinavian (“Scandi”) grind: The blade holds its thickness from the top (spine) most of the way toward the edge, which has a single bevel extending quite high up each side.
![]() Knife edge grinds. Courtesy Off the Map custom knives.
Knife edge grinds. Courtesy Off the Map custom knives.
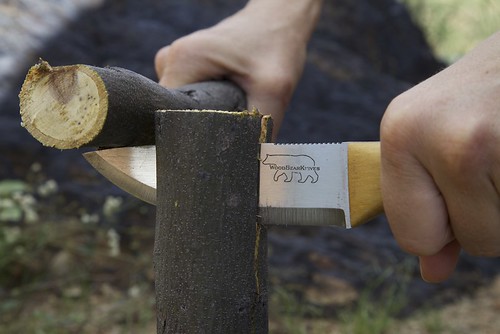
The Scandi grind is immensely robust—bushcrafters use these knives to split two-inch-thick limbs lengthwise by “batoning,” that is, holding the edge of the blade against the end of the limb, and using another length of limb to hammer the knife straight down. The technique even works across the grain. Yet the Scandi grind can be given a razor edge; that broad bevel makes it easy to index the blade on a simple sharpening stone if you don’t have a sophisticated system such as the Edge Pro. If the grind has a weakness, it is for exceptionally fine slicing—that broad bevel acts as a wedge rather than a scalpel. Scandi blades make lousy cheese cutters.
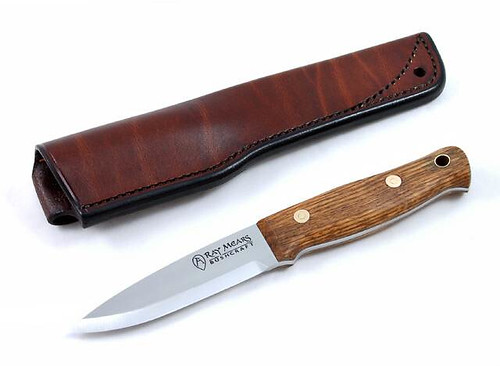
![]() The current Ray Mears knife has a durable English oak handle.
The current Ray Mears knife has a durable English oak handle.
The genuine Woodlore knife rightfully carries a substantial premium given its provenance; high-quality copies are available for less for those who don’t need or can’t afford the Woodlore signature. I have a bushcraft knife nearly as well-known in the community: a stout design called a Skookum Bush Tool, made in Whitefish, Montana by Rod Garcia. Rod enhanced the Woodlore pattern by adding a flat steel back on the handle, which is welded to the full-tang blade and enables the user to hammer this thing point-first into, well, anything that needs a knife hammered into it.
Many other knives parallel the bushcraft style, from the astoundingly underpriced ($18) and overperforming Mora Clipper to custom models made with exotic steels and even more exotic hardwood scales (handles), which can easily top $500. As an all-around field knife the bushcraft design is hard to beat, although flat-ground and hollow-ground blades also work very well for most tasks, and better for some.
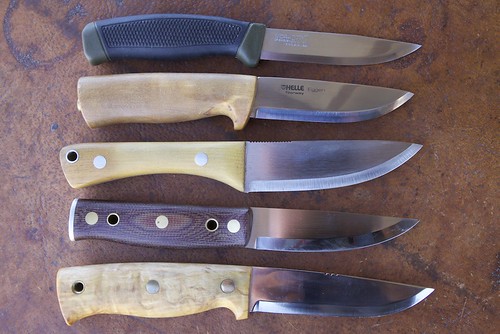
![]() Top to bottom: Mora Clipper, Helle Eggen, Wood Bear, Skookum Bush Tool, Helle Temagami.
Top to bottom: Mora Clipper, Helle Eggen, Wood Bear, Skookum Bush Tool, Helle Temagami.
In the last few years an entirely different style of FBK has become increasingly popular, especially among the survival community (by which I mean people interested in survival skills, not the guys who hole up in the Idaho mountains with “Bo Gritz for President” posters tacked up in the fallout shelter). The style is frequently referred to even among its proponents as a “sharpened pry bar.” Forget handiness—these knives are massive, and built to withstand laughable abuse—one popular demonstration involves chopping through a concrete block, another, repeatedly stabbing though a car door. The fact that they have a cutting edge seems secondary to the astounding breadth of ancillary destructive purposes to which one is assured they can be directed. The names of these things echo their marketing: Compare the quasi-Elvish “Woodlore” with the “Swamp Rat,” the “Black Legion,” or the “Extreme Survival Bowie.” And, yes, there is an official “Zombie Killer,” with a, not making this up, “Toxic Green” handle.
I picked up one of the early examples of this genre, the Gerber LMF-2, at a trade show some years ago, and immediately put it down. The knife was heavy and unbalanced, and its “tactical” sheath, complete with de rigueur mid-thigh mounting straps, weighed more than the knife. Similar models from other makers impressed me no more, and I dismissed the entire concept as a short-lived fad.
Wrong. The LMF-2 is still around, and has been challenged by even more bloated competitors. So I decided to give the concept a fair chance, and procured an LMF-2 as well as a Ka-Bar/Becker BK-2. I used each for several days around our place and in the surrounding desert, on tasks for which I’ve been using much smaller knives for tens of years.
![]() Top: the Becker/Ka-Bar BK-2; bottom, the Gerber LMF-2.
Top: the Becker/Ka-Bar BK-2; bottom, the Gerber LMF-2.
And . . . I still don’t get it.
The LMF-2 has that most worthless of blade styles, half plain and half serrated—which leaves neither enough room to do its job. The (reasonably sharp) plain edge is out at the end, is mostly curved, and is barely three inches long despite this knife’s 10.5-inch overall length and three-quarter-pound weight (LMF, perversely, stands for “Lightweight Multi-Function”). The blade on my Swiss Army knife is only a half-inch shorter. The Gerber’s serrated section, as with all such edges, is virtually impossibly to sharpen in the field—although the nifty sharpening slot in the LMF-2’s plastic sheath is okay for touching up the plain edge. By way of comparison, one of the best field knives I own, a Helle Temagami, weighs just 5.4 ounces despite 4.5 inches of usable blade.
The knife is undeniably stout. The pointed pommel, I’m sure, could “egress through the plexiglass of a chopper” as Gerber claims. In fact, as kit for a combat pilot, the LMF-2 might not be a bad tool at all. But for any kind of regular use in the field—including survival—the LMF-2 has all the wrong answers to the questions that are most asked in such situations. It even touts the ultimate lunacy for a survival knife: three holes in the handle so you can “lash it to a stick and make a spear.” Lord spare us from such nonsense.
However. If I thought the Gerber was unwieldy, the Ka-Bar/Becker BK-2 makes it look like a surgeon’s scalpel from Porsche Design.
I’m convinced the designer of the Becker had an LMF-2 for comparison, and simply decided that whatever it had, the BK-2 was going to have more. So the Gerber weighs 12 ounces? This knife is going to weigh a pound. The Gerber’s blade is a fifth of an inch thick? Ha!—we’ll make ours a quarter of an inch thick. And then add a bit.
The result is one of the most cartoonishly overbuilt and comically awkward knives I’ve ever owned.
![]() Seriously? The monstrous BK-2 next to the far more practical Temagami.
Seriously? The monstrous BK-2 next to the far more practical Temagami.
The makers tout the Becker’s chopping ability—the supposed payoff for the weight and bulk—but in fact it’s a lousy chopper. Despite the massive blade, it’s still handle-heavy, and the edge is not long enough to gain the speed and momentum even a lightweight machete can achieve. There is no reason—not one—to make a knife blade a quarter of an inch thick, except to one-up someone else’s blade. No user could ever put enough leverage on this knife to bend, much less break it. It is simply dead weight. Its sole positive feature is that it blessedly dispenses with serrations (or, worse, saw teeth), but the spine is so thick and the knife so heavy that normal cutting operations—the kind you need to do 99 percent of the time even if you are a combat pilot—become ham-fisted struggles, like tapping in finish nails with a three-pound sledge.
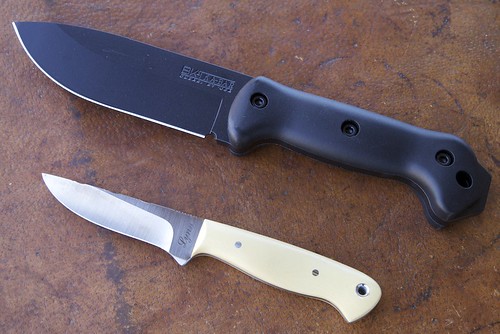
![]() The Becker dwarfs a lovely model from knifemaker Lynn Dawson, with a hollow-ground blade just three inches long. Yet I field-dressed a whitetail deer with the Lynn knife . . .
The Becker dwarfs a lovely model from knifemaker Lynn Dawson, with a hollow-ground blade just three inches long. Yet I field-dressed a whitetail deer with the Lynn knife . . .
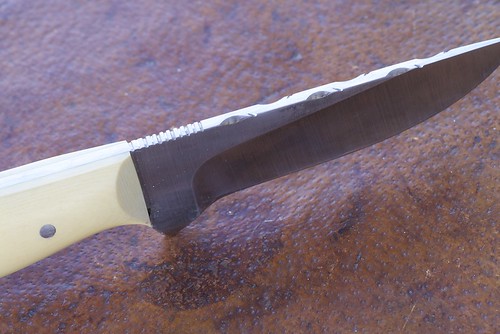
![]() . . . and the Lynn sports some nice file work on the spine. Tough doesn't have to be ugly.
. . . and the Lynn sports some nice file work on the spine. Tough doesn't have to be ugly.
Believe it or not, the LMF-2 and BK-2, with mere five-inch blades, are on the small end of their phylum. The ESEE Junglas (pronounced hoonglas) sports a 9.75-inch blade—actually almost long enough to be credible as a chopping tool, but with a concurrent reduction in practicality to near zero for any normal cutting tasks (To be fair, ESEE makes some entirely practical smaller models as well).
Let’s put together some numbers here. For the weight of a BK-2 one could carry a Helle Temagami, or a Woodlore clone, or any number of other fine, compact, well-balanced—and, dare I say, beautiful—cutting instruments, plus a Gerber folding saw, plus a lightweight sharpener. You’d have a vastly superior knife and a better, safer way to cut through larger limbs than hacking away with that “sharpened prybar.”
Ah, but what about the scenario the armchair experts like to debate ad nauseum: You’ve somehow been stupid enough to be caught out in the wilderness with nothing but a single knife. No saw, no machete, no matches, no tent, no iPhone. You need to survive with that one tool.
Give me the bushcraft knife any day.
Most of the tasks you’ll need to do to stay alive in such situations—building a shelter, making fire, perhaps constructing snares or deadfalls—are far more easily accomplished with a modestly sized blade. You won’t need branches larger than two inches in diameter for a lean-to, and those are easily cut with a bushcraft knife and, if needed, a baton. (Batoning is also infinitely safer than chopping; need I mention that severing a major artery would be inconvenient at this point?)
The rest—hearths and drills for a friction fire, snares, field-dressing game—require a deft touch with a blade. You’ll operate more quickly, surely, and with less energy expenditure if you have a knife as deft as the task.
And back in the real world? No contest. I got annoyed just carrying the BK-2, much less using it. It was a major relief to get back to my normal knives.
If you’re traveling by 4WD vehicle, or even by motorcycle where weight is much more of a concern, there’s simply no reason to consider dragging along an awkward, heavy knife that tries to take the place of two or three tools, even if the concept worked. Buy a good, sensibly sized FBK, and carry a folding saw, hatchet, or small axe for larger cutting tasks (for a really nice combination look HERE). You’ll be more effective and safer.
Besides, I hear axes work better on zombies anyway.
![]()
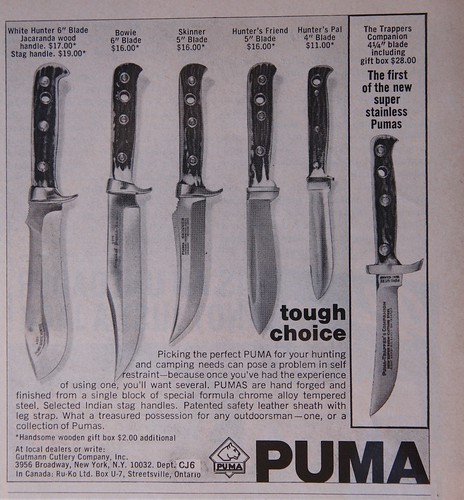
![]() Edit: Found an old ad. The Trapper's Companion originally listed for $28. I should have got a second job and bought 20 of them then.
Edit: Found an old ad. The Trapper's Companion originally listed for $28. I should have got a second job and bought 20 of them then.
Links:
Woodlore, Helle, Mora, Wood Bear, Skookum Bush Tool, Off the Map, Ka-Bar, Gerber
For interesting Puma lore, and occasional knives for sale, go HERE.